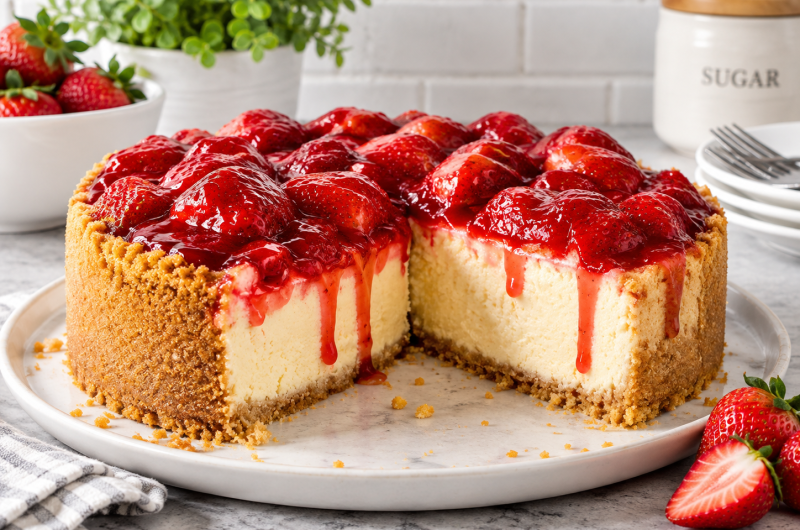

Strawberry cheesecake is a classic dessert made with a creamy baked filling, a buttery biscuit crust, and a fresh strawberry topping. This version has a soft, smooth center that is rich without feeling overly heavy. The strawberry sauce adds a bright fruit flavor and gives every slice a colorful finish.
What Makes This Cheesecake Special
This cheesecake has three main layers that work well together. The biscuit crust forms a firm base and rises along the sides of the pan, the baked filling stays creamy and light, and the strawberry topping adds a sweet fruit layer. Each part can be prepared separately before being brought together.
The Biscuit Crust
The crust starts with plain biscuits crushed into fine crumbs and mixed with melted butter. The mixture should resemble wet sand when it is ready to press into the pan. A firm crust is especially useful here because it also forms a wall around the filling and helps hold the strawberry topping in place.
Choosing the Biscuits
Several plain biscuits can be used for the crust. The supplied recipe lists Arnott’s Marie crackers or other plain biscuits, as well as Graham Cracker squares. Digestive biscuits are another option mentioned in the original recipe. The important point is to crush the biscuits finely enough that they pack together properly.
Preparing the Springform Pan
A little preparation makes the finished cheesecake easier to remove. The springform pan is prepared with the base turned upside down, followed by a light coating of butter and a square of parchment paper. The paper is secured when the pan is closed, leaving some excess paper outside the edges.
Building the Crust
After the biscuits are crushed, melted butter is mixed through the crumbs. The mixture is spread over the base of the prepared pan and pressed upward along the sides. A flat-bottomed measuring cup or similar utensil can make this easier, especially when creating straight, even walls.
Why the Crust Goes Up the Sides
The biscuit wall gives the cheesecake a finished appearance and provides extra support around the strawberry topping. It also creates a pleasant contrast between the crisp biscuit layer and the creamy filling. Press the crumbs firmly, particularly around the sides, so the crust holds its shape after baking.
Making the Cheesecake Filling
The filling uses cream cheese, flour, vanilla, sour cream, caster sugar, lemon zest, and eggs. These ingredients create a creamy center with a slightly lighter texture than a very dense New York-style cheesecake. The lemon zest adds a subtle citrus flavor that works particularly well with strawberries.
Working With Cream Cheese
The cream cheese should be softened before mixing. Beat it only until smooth, rather than whipping it for a long time. The goal is to combine the ingredients without adding too much air to the batter.
Adding the Remaining Ingredients
Once the cream cheese is smooth, add the flour and mix briefly. Then add the vanilla, sour cream, caster sugar, and lemon zest. The eggs are added one at a time, with a short mixing period after each addition. Stop mixing once everything is incorporated.
Why You Should Avoid Overmixing
A cheesecake filling does not need to be beaten until fluffy. Excessive mixing can introduce too much air, which may cause the cheesecake to rise during baking and then sink as it cools. Keeping the mixing time short helps the finished surface remain more even.
Preparing the Oven
The oven should be preheated to 160°C/320°F for a standard oven or 140°C/295°F for a fan or convection oven. Place the prepared springform pan in the oven once the filling has been added. Correct oven temperature is important because cheesecake benefits from gentle, steady baking.
Baking the Cheesecake
Pour the filling into the prepared biscuit crust and smooth the surface if needed. Bake for about 55 minutes. The cheesecake should be lightly golden on top and should not show obvious cracks. When the pan is gently moved, the center should still have a slight jiggle.
Cooling After Baking
Do not remove the cheesecake immediately after it comes out of the oven. Instead, let it cool inside the oven with the door open slightly. The supplied recipe recommends leaving the oven door open about 20 cm/8 inches for 20 minutes. This gradual cooling helps reduce sudden temperature changes.
Chilling the Cheesecake
After the initial cooling period, refrigerate the cheesecake in its pan for at least 4 hours. Chilling gives the filling time to firm up and makes the cheesecake easier to remove and slice. For the cleanest slices, make sure the cheesecake is properly chilled before adding the final presentation touches.
Removing the Cake From the Pan
Once the cheesecake is cold, carefully remove the sides of the springform pan. Use the parchment paper overhang to help slide the cheesecake from the base onto a serving plate. The inverted base makes this easier because it removes the raised edge that can otherwise interfere with transferring the cake.
Making the Strawberry Topping
The strawberry topping is made from strawberries, sugar, lemon juice or water, vanilla, and cornflour. Part of the strawberries is diced for the sauce, while the remaining strawberries are halved. The diced fruit breaks down during cooking and forms the base of the topping.
Cooking the Strawberry Sauce
Place the chopped strawberries, sugar, vanilla, and lemon juice or water in a saucepan. Bring the mixture to a simmer over medium heat and cook for about 10 minutes. During this time, the strawberries soften and release their juices, creating a thick fruit mixture.
Thickening the Topping
Cornflour is mixed with water separately before being added to the saucepan. Stir it into the strawberry mixture and continue cooking briefly. This thickens the sauce so it can sit on top of the cheesecake instead of running immediately off the edges.
Adding the Strawberry Halves
Once the sauce has thickened, add the halved strawberries. Cook them for about one minute, just long enough to soften them slightly. Keeping some strawberry halves intact gives the topping more texture and makes the finished cheesecake look more attractive.
Getting the Right Consistency
The strawberry topping should be thick enough to sit on the cheesecake but loose enough to slowly move when the cake is cut. It will continue to thicken as it cools, so it is better not to make it extremely thick while it is still hot.
Adjusting the Sauce
After the topping has cooled, check its consistency. If it has become thicker than you want, add a very small amount of water and stir. Add the water gradually rather than all at once because only a little may be needed to bring the sauce back to a smooth, spoonable consistency.
Adding the Strawberry Layer
Spoon the cooled strawberry mixture over the chilled cheesecake and spread it into an even layer. Arrange the strawberry halves so they sit neatly across the surface. Once covered, refrigerate the cheesecake for at least another 2 hours before slicing.
Why the Strawberry Topping Matters
The fruit topping does more than decorate the cake. Its sweet and slightly tart flavor cuts through the richness of the cream cheese filling. The soft strawberries also provide a different texture from the creamy center and buttery biscuit crust.
Lemon Zest in the Filling
The lemon zest is a small ingredient, but it gives the cheesecake filling extra freshness. Lemon and strawberry are naturally well suited to each other, so the zest helps connect the flavor of the creamy filling with the fruit topping without making the cheesecake strongly lemon-flavored.
Sour Cream in the Filling
Sour cream contributes to the softer texture of this cheesecake. The filling remains rich because of the cream cheese, but it is not intended to have the extremely dense texture associated with some traditional New York cheesecakes. This makes it pleasant to eat with the fruit topping.
No Water Bath
This recipe does not require a water bath. The supplied method specifically avoids one and instead uses controlled baking and gradual cooling. That means there is no need to wrap the springform pan in foil or deal with water around the cake while it bakes.
Preventing Surface Cracks
Keeping the filling from becoming overly aerated is one of the important steps. Mix only until the ingredients are combined and avoid extended beating. Cooling the cheesecake gradually in the oven after baking is another part of the method intended to help protect the surface.
Strawberry Sweetness
The strawberry topping includes either lemon juice or water. The choice can depend on the sweetness of the strawberries. If the fruit is already quite sweet, lemon juice can add a little acidity, while water provides a milder flavor.
Preparing the Dessert Ahead
Strawberry cheesecake is well suited to advance preparation because both the cheesecake and topping require chilling. The topping can be prepared ahead and added to the chilled cake before serving. The supplied storage guidance says the finished cake is best eaten within about 4 days.
Storing Leftovers
Keep the cheesecake refrigerated in a covered container or protected on a serving plate. Over several days, the topping may release a little moisture, but the cake can still be enjoyed. For the best texture, serve it within the recommended storage period.
Serving the Cheesecake
Use a sharp knife to cut the chilled cheesecake into portions. Wipe the knife between cuts if you want cleaner slices. Each serving should show the biscuit crust, creamy cheesecake center, and strawberry topping together.
Keeping the Slices Neat
A well-chilled cheesecake is easier to slice than one that is still warm or only partly set. Allow the cake to complete its chilling time before cutting. The strawberry topping should also be cooled before it is spread over the cheesecake so it does not soften the filling.
Texture of the Finished Cake
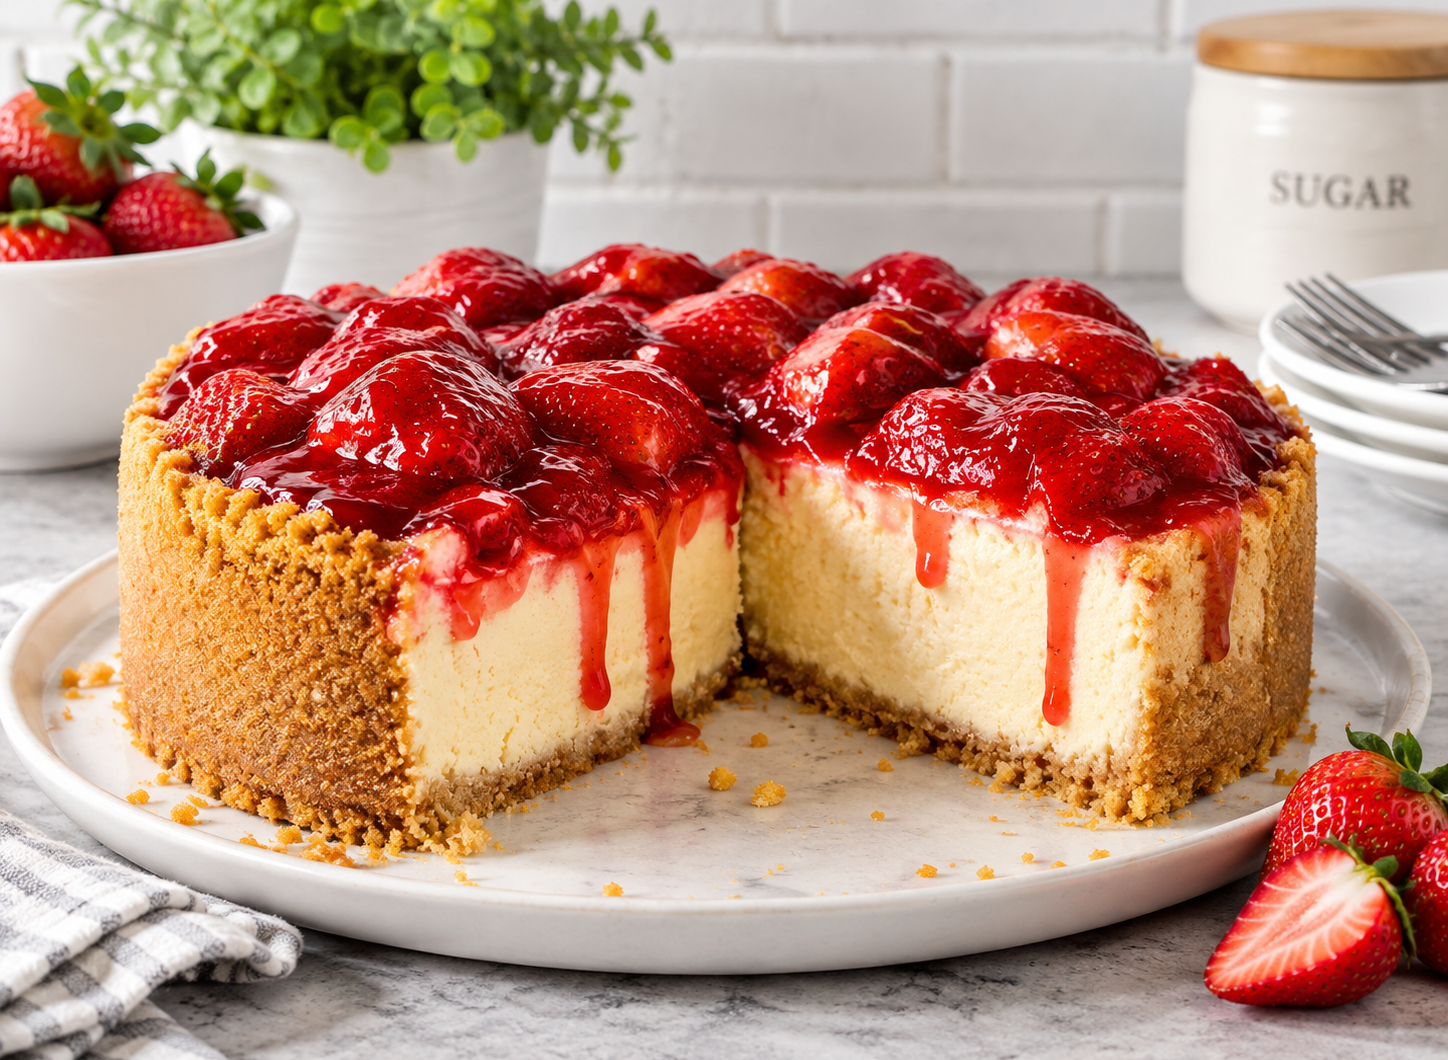
The finished cheesecake should have a creamy center, a firm biscuit crust, and a soft strawberry topping. The filling should not be dry or stiff, while the fruit sauce should remain spoonable rather than becoming a firm jelly. These textures make the three components work together in each bite.
Making the Crumbs Properly
Fine biscuit crumbs are useful because they pack together more firmly when combined with butter. If the crumbs are too coarse, the crust may be harder to shape and may not hold together as evenly. A food processor is convenient, but the biscuits can also be crushed inside a sealed bag with a rolling pin.
Finishing the Dessert
After the final chilling period, the cheesecake is ready to slice and serve. The strawberry topping should remain glossy and slightly loose rather than completely set. Keep any extra strawberry sauce chilled and serve it alongside individual slices if desired.
Healthy Strawberry Cheesecake Recipe
A creamy baked cheesecake with a buttery biscuit crust and a sweet strawberry topping made with fresh strawberries, lemon, vanilla, and sugar.
12
servings30
minutes55
minutes489
kcal6
hours7
hours25
minutesIngredients
- Cheesecake Biscuit Base
200 g / 7 oz crackers or other plain biscuit, or 28 Graham Cracker squares
120 g / 8 tbsp unsalted butter, melted
- Cheesecake Filling
500 g / 1 lb cream cheese, softened
2 tbsp plain flour (all purpose flour)
1 tsp vanilla extract
1/2 cup sour cream (full fat, sub sour cream)
1 1/2 cups caster sugar (superfine sugar)
Zest of 1 lemon
3 eggs, at room temperature
- Strawberry Topping
500 g / 1 lb strawberries, half diced and half halved
2 tbsp lemon juice OR water
1/2 cup white sugar
1/2 tsp vanilla extract
1 1/2 tsp cornflour/cornstarch
2 tbsp water
Directions
- Preheat the oven to 160°C/320°F for a standard oven or 140°C/295°F for fan/convection. Prepare a 20 cm/8-inch springform pan by turning the base upside down, lightly buttering it, adding parchment paper, and lining the sides.
- Crush the biscuits into fine crumbs and combine them with the melted butter. Press the mixture firmly over the base and up the sides of the prepared pan, using a flat-bottomed utensil to make the crust even.
- Beat the softened cream cheese just until smooth. Add the flour, then the vanilla, sour cream, sugar, and lemon zest. Add the eggs one at a time, mixing only until each is incorporated. Pour the filling into the prepared crust and bake for 55 minutes.
- Leave the cheesecake in the switched-off oven with the door open about 20 cm/8 inches for 20 minutes. Refrigerate it in the pan for at least 4 hours, then remove the sides and carefully transfer the cheesecake to a serving plate.
- For the strawberry topping, simmer the diced strawberries, sugar, vanilla, and lemon juice or water over medium heat for 10 minutes. Mix the cornflour with the 2 tablespoons of water, stir it into the saucepan, then add the halved strawberries and cook for 1 minute.
- Let the strawberry topping cool until it reaches a thick but slightly flowing consistency. Spread it over the chilled cheesecake and refrigerate for at least 2 more hours before slicing and serving.
Nutrition Facts
- Calories: 489kcal
- Fat: 28g
- Cholesterol: 114mg
- Sodium: 284mg
- Carbohydrates: 55g
- Fiber: 1g
- Sugar: 41g
- Protein: 5g
- Calcium: 80mg
