

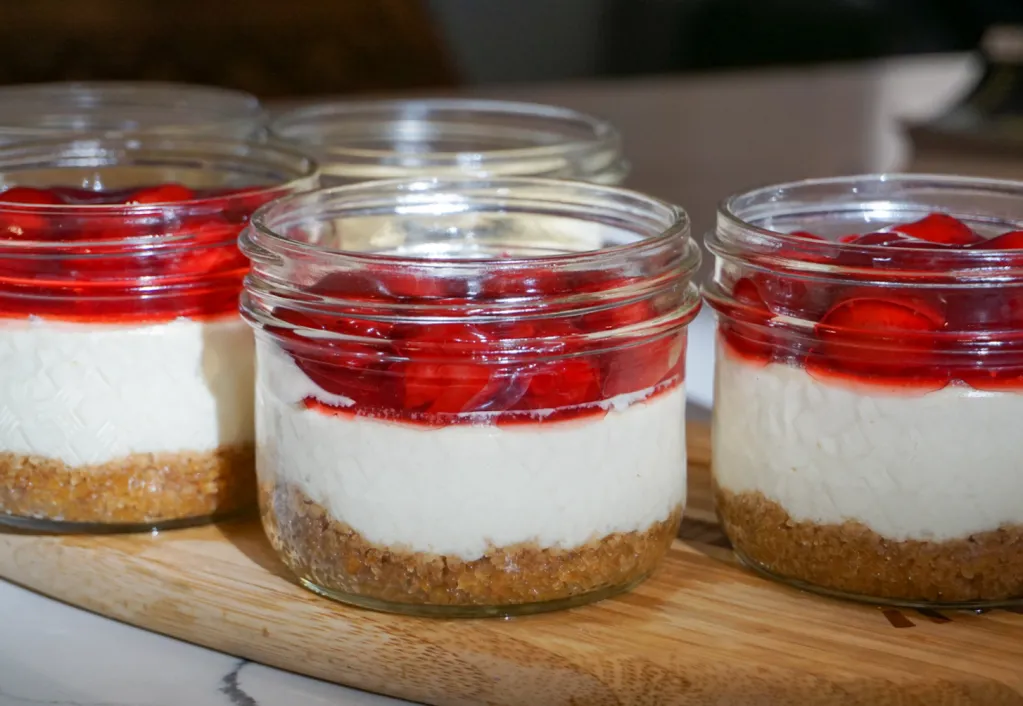
If you love classic cheesecake but want a dessert with a little more protein, these High Protein Cheesecake Jars are a delicious option. Each jar has a buttery graham cracker crust, a smooth vanilla cheesecake filling, and a sweet cherry topping.
These individual cheesecakes are creamy, rich, and satisfying without requiring you to make a full-size cheesecake. Baking them in individual jars also makes portioning and serving incredibly easy.
The filling combines cream cheese with Greek yogurt, cottage cheese, and vanilla protein powder. The cottage cheese and Greek yogurt blend beautifully into the mixture, creating a smooth cheesecake texture while adding extra protein.
Once the cheesecakes have chilled and set, they are finished with cherry pie filling for a classic cherry cheesecake combination. The tartness of the cherries balances the creamy filling and buttery crust perfectly.
Whether you’re preparing dessert for the family, making something for a gathering, or simply want individual desserts ready in the refrigerator, these cheesecake jars are worth adding to your recipe collection.
Why You’ll Love These Cheesecake Jars
There are several things that make these individual cheesecakes so convenient.
They’re portioned individually. Instead of slicing an entire cheesecake, each jar is already divided into a serving.
They’re packed with creamy flavor. Cream cheese, Greek yogurt, vanilla, and cottage cheese create a smooth and rich filling.
They include extra protein. Vanilla protein powder is blended directly into the cheesecake mixture.
They’re make-ahead friendly. The cheesecakes need several hours to chill, so they’re perfect for preparing in advance.
The cherry topping adds a burst of flavor. Sweet cherry pie filling pairs beautifully with the vanilla cheesecake.
They’re easy to customize. You can change the crust, topping, or even leave out the protein powder if desired.
Ingredients You’ll Need
For the Graham Cracker Crust
Butter: Melted butter binds the graham cracker crumbs together and gives the crust a rich flavor.
Graham cracker crumbs: These create the classic cheesecake base. You can buy ready-made crumbs or crush whole graham crackers yourself.
Sugar: A small amount adds sweetness to the crust.
Salt: Salt helps balance the sweetness and brings out the buttery flavor.
For the Cheesecake Filling
Cream cheese: Use room-temperature cream cheese for the smoothest filling.
Sugar: Provides sweetness and balances the tanginess of the cream cheese and yogurt.
Greek yogurt: Greek yogurt adds creaminess and contributes additional protein to the filling.
Cottage cheese: Don’t worry if you don’t normally use cottage cheese in cheesecake. Once blended, it becomes smooth and creamy and is virtually unnoticeable in the finished filling.
Vanilla protein powder: Vanilla protein powder gives the cheesecake its extra protein and adds another layer of vanilla flavor.
Egg: The egg helps the cheesecake filling set properly during baking.
Vanilla extract: Vanilla enhances the flavor of the entire filling.
For the Cherry Topping
Cherry pie filling: A spoonful of cherry pie filling on top gives these cheesecakes their classic cherry cheesecake finish.
You can use your favorite brand or substitute another fruit topping if you prefer.
The Importance of Room-Temperature Ingredients
One of the most important tips when making these cheesecake jars is to let the refrigerated ingredients come to room temperature before blending.
Cold cream cheese, Greek yogurt, and cottage cheese can make the filling difficult to blend smoothly. You may end up with small lumps, especially around the cream cheese.
Allow the cream cheese, yogurt, cottage cheese, and egg to sit out briefly before preparing the filling.
You don’t need to leave them out for an extended period. Just give them enough time to lose their refrigerator chill.
How to Make High Protein Cheesecake Jars
Step 1: Prepare the Oven
Preheat your oven to 300°F (150°C).
You’ll be baking the jars in a water bath, which helps the cheesecakes bake gently and evenly.
Step 2: Make the Crust
Add the melted butter, graham cracker crumbs, sugar, and salt to a bowl.
Mix everything together until the crumbs are evenly coated with butter.
Divide the mixture between five wide-mouth 250 mL jars. Add approximately two scoops of the crust mixture to each jar and press it down gently.
You don’t need to pack the crust extremely firmly. Just press it enough to create an even layer across the bottom.
Place the jars in the preheated oven and bake the crust for about 10 minutes.
While the crust is baking, prepare the cheesecake filling.
Step 3: Blend the Filling
Add the room-temperature cream cheese, sugar, Greek yogurt, cottage cheese, vanilla protein powder, egg, and vanilla extract to a blender.
Blend until the mixture is completely smooth and creamy.
Take a moment to scrape down the sides of the blender if necessary. You want all of the ingredients fully incorporated before filling the jars.
Step 4: Fill the Jars
Carefully divide the cheesecake mixture evenly between the five jars.
Try to leave some space at the top rather than filling the jars completely. The filling should reach roughly 80 percent of the way up the sides.
Keeping the portions even will help the jars bake at approximately the same rate.
Step 5: Prepare the Water Bath
Place the filled jars in a deep baking pan.
Carefully pour water into the baking pan around the jars. The water should surround the jars without getting inside them.
The water bath creates a gentler baking environment and helps prevent the cheesecake filling from drying out.
Step 6: Bake
Place the pan in the oven and bake the cheesecake jars for approximately 30 minutes.
After 30 minutes, turn off the oven but leave the jars inside for another hour.
This gradual cooling helps the cheesecakes finish setting without exposing them immediately to a dramatic temperature change.
Step 7: Chill
Remove the jars from the oven and allow them to cool as needed before transferring them to the refrigerator.
Refrigerate for approximately 4 hours, or until the cheesecakes are fully chilled and set.
Don’t rush this step. The refrigeration time is important for achieving the creamy, firm cheesecake texture.
Step 8: Add the Cherry Topping
Once the cheesecake jars have completely chilled, spoon a few tablespoons of cherry pie filling over each cheesecake.
Spread it gently across the top or leave it in a small mound in the center.
For an extra-pretty presentation, add a few fresh cherries if they’re available.
What Size Jars Should I Use?
For this recipe, 250 mL wide-mouth jars work particularly well.
The wide opening makes it easier to add the crust and filling, and it also makes the finished cheesecake easier to eat.
Using jars of the same size also helps keep your portions consistent and makes the baking time more predictable.
If you use smaller jars, you’ll end up with more individual servings and will likely need to reduce the baking time.
Larger jars will produce fewer servings and may require additional baking time.
Keep in mind that baking times can vary depending on the size and shape of your jars, so watch the cheesecakes carefully if you change the container size.
Easy Substitutions
Use a Different Crust
Graham crackers give these cheesecake jars a classic flavor, but you can experiment with other options.
Crushed digestive biscuits, oatmeal cookies, or another favorite cookie can all be used as alternatives.
For a gluten-free option, choose a suitable gluten-free biscuit or use almond meal as a different style of crust.
Change the Sweetener
The sugar can be adjusted according to your preference.
You can experiment with a suitable sugar substitute if desired. Keep in mind that changing the sweetener may affect the flavor and texture of the crust or filling.
Try Another Topping
Cherry is a classic choice, but you’re certainly not limited to cherries.
Try fresh strawberries, blueberries, raspberries, peaches, or your favorite fruit sauce. A spoonful of jam can also work well.
Can I Leave Out the Protein Powder?
Yes.
If you don’t have protein powder or simply don’t want to use it, you can omit it from the recipe.
The cheesecake will still have a creamy texture, although the protein content per serving will be lower. Based on the original recipe calculation, the protein content would be approximately 9 grams per jar without the protein powder.
Keep in mind that the exact nutrition will vary depending on the specific cream cheese, yogurt, cottage cheese, protein powder, and topping you use.
Storage
Keep the cheesecake jars refrigerated in sealed containers or with their lids securely covered.
For the best flavor and texture, enjoy them within 3–4 days.
The cheesecakes should remain refrigerated rather than sitting at room temperature for extended periods.
When you’re ready to eat one, you can take it out of the refrigerator and let it sit at room temperature for about 30 minutes. This allows the filling to soften slightly and gives it an even creamier texture.
Approximate Nutrition
Each cheesecake jar contains approximately:
- 350 calories
- 16 grams protein
- 23 grams carbohydrates
These figures are estimates and can change depending on the brands and ingredients used, particularly the protein powder, yogurt, cream cheese, graham crackers, and cherry pie filling.
Recipe Notes
For the smoothest filling, use room-temperature ingredients.
Don’t skip the water bath because it helps the cheesecake bake more gently.
Allow the jars to cool gradually in the switched-off oven before chilling.
Give the cheesecakes plenty of time in the refrigerator to set properly.
Use wide-mouth 250 mL jars for the most consistent results.
Add the cherry topping after the cheesecake has completely chilled.
Frequently Asked Questions
Can I make these cheesecake jars ahead of time?
Yes. These are an excellent make-ahead dessert. Prepare them the day before, refrigerate them overnight, and add the cherry topping when you’re ready to serve.
Can I use another protein powder flavor?
Yes. Vanilla works especially well, but you could experiment with another flavor that complements cheesecake and your chosen fruit topping.
Can I use fresh fruit instead of pie filling?
Absolutely. Fresh berries, sliced peaches, cherries, or another fruit can be used in place of canned pie filling.
Do the jars need to be covered while chilling?
Covering the jars is recommended. It helps prevent them from absorbing refrigerator odors and keeps the cheesecake fresh.
Can I use smaller jars?
Yes, but the baking time will need to be adjusted. Smaller jars will cook more quickly, so begin checking them earlier than the recipe’s suggested baking time.
High Protein Cheesecake Jars with Cherry Topping
These High Protein Cheesecake Jars are a fun way to enjoy the flavors of traditional cheesecake in convenient individual portions.
The creamy vanilla filling, buttery graham cracker crust, and cherry topping make every spoonful delicious, while Greek yogurt, cottage cheese, and protein powder give the filling an extra protein boost.
They’re simple enough to prepare ahead for the week but special enough to serve as an individual dessert when you’re entertaining.
If you’re a cheesecake fan, these little jars are definitely worth trying. Keep them chilled, add the cherry topping just before serving, and enjoy a creamy homemade dessert straight from the refrigerator.
High Protein Cheesecake Jars
5
servings20
minutes1
hour30
minutes350
kcal4
HourIngredients
Crust : 57 g melted butter : 57 g melted butter
150 g 150 graham cracker crumbs
1 teaspoon 1 sugar
½ teaspoon salt
Filling: 226 g cream cheese, room temperature
50 g 50 sugar
120 g 120 Greek yogurt, room temperature
120 g 120 cottage cheese, room temperature
30 g 30 vanilla protein powder
1 1 egg, room temperature
1 teaspoon 1 vanilla extract
Topping: ½ can cherry pie filling
Directions
- Preheat the oven to 300°F (150°C).
- Combine melted butter, graham cracker crumbs, sugar, and salt.
- Divide the crust mixture between five 250 mL wide-mouth jars and gently press into the bottoms.
- Bake the crusts for 10 minutes.
- Blend cream cheese, sugar, Greek yogurt, cottage cheese, protein powder, egg, and vanilla until completely smooth.
- Divide the filling evenly between the jars, filling each approximately 80% full.
- Place the jars in a baking pan and carefully add water around them to create a water bath.
- Bake for 30 minutes.
- Turn the oven off and leave the jars inside for another hour.
- Remove the jars and refrigerate for approximately 4 hours, or until fully set.
- Spoon cherry pie filling over each chilled cheesecake before serving.
